
The smallest possible buttonhole you can make in knitting is only one stitch wide, and one stitch tall. The classic eyelet buttonhole is simply yo, k2tog. It leaves a one stitch hole in your fabric, but it’s also a rather weak hole, prone to stretching out over time.
This is something I’ve been thinking about for a while – how to make the basic yo, k2tog buttonhole better. After some trial and testing, both by myself and some lovely people on Ravelry, I think I’ve got something worth posting about.
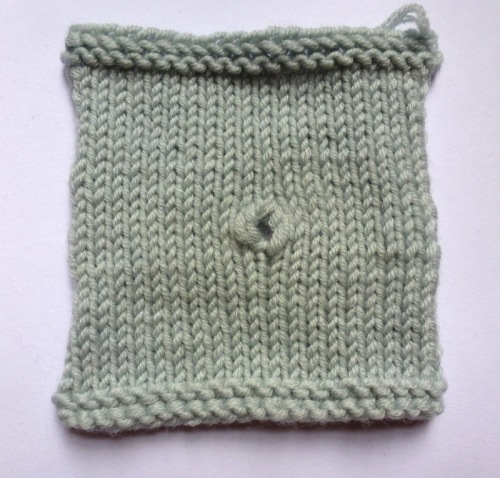
The Improved Eyelet Buttonhole is quite symmetrical and doesn’t have any single strands of yarn to take all the stress, unlike the yarnover eyelet. It’s also surprisingly stretchy considering how sturdy it is. It works best with a springy yarn, and a background fabric gauge that’s a little on the tight side. It’s particularly sturdy widthways, so I think it would work fantastically on baby cardis with knitted-in buttonholes, or button-up cuffs on gloves. Or anywhere where you need a small buttonhole really!
I happily admit to taking inspiration from the Tulips buttonhole by Techknitter, which is a rock-solid and perfectly symmetrical horizontal buttonhole. I’m a big fan of her approach to knitting construction in general. If you’ve also tried out the Tulips buttonhole, then maybe you’ll like this too.
The Improved Eyelet Buttonhole (IEB!) is worked over 3 rows and 1 stitch, and doesn’t require any extra equipment. The hole comes out at roughly the same size as a yarnover in the same yarn, and it’s centred on the second row. This eyelet involves significantly more steps than a yarnover eyelet, in much the same way the Tulips buttonhole requires more steps than a Bind-off/cast-on buttonhole, but hopefully it’ll prove worth it.
The basic concept of the Improved Eyelet buttonhole is that you knit twice into one stitch, then wrap those two new stitches. The strand between these wraps is picked up and becomes the ‘yo’ that makes the hole. Then all stitches are decreased back to a single one to keep the count straight.
The instructions here are for knitting flat.
Row 1 (RS)
Knit into the front and back of the same stitch, wrapping the yarn three times around the needle for each stitch. Knit the rest of the row as usual.
Row 2 (WS)
Purl until you reach the triple-wrapped stitchs. Slip the wrapped stitches with yarn forward, letting them unloop in the process. You now have two ‘long’ stitches.

Slip the left one back to the left needle. You are now going to wrap the long stitch on the right needle.
Bring the working yarn from front to back.

Slip the long stitch from the right to left needle. Bring yarn forward again.

Slip the long stitch from left to right needle again.

Now, yarnover, bringing the working yarn back to the front.

Slip the left long stitch back onto the right needle. Pass the yarnover over this stitch.

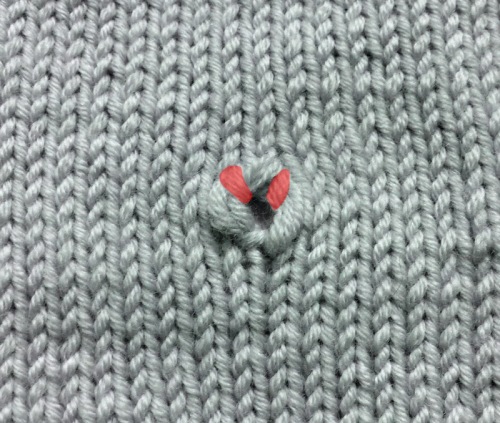
Both long stitches are now wrapped. That’s the hardest bit over! Be very careful not to pull these wraps too tight, as their tension determines the tightness of the finished eyelet.
If you were to look at a cross-section of this wrap it would look like this.

Purl the rest of the row.

Row 3
Knit until you reach your wrapped stitches. Slip the first long stitch.

Pick up the strand between the long stitches by inserting the left needle tip underneath it from the front.

Knit this strand, making sure not to twist it as that will close the eyelet. Then pass the right long stitch over it.

Slip stitch from right needle to left.

Pass the remaining long stitch over the just slipped stitch.

Slip stitch from left needle to right. Buttonhole complete! Continue knitting as normal.

The front and back are shown here, with the visible wraps highlighted. You can see how neatly they fit in with the purl bumps at the back..


Looks great – I’ll have to try it next time I need buttonholes. I think especially as a gift for a non-knitter, this buttonhole would be easier to locate in the fabric than a standard yarn-over one. Thanks for the pictures, they made the tutorial much easier to read.
I love this technique and will definitely be trying this out on my next baby cardigan.
This is great. I’m teaching a class on buttonholes and bands on Saturday and this makes a wonderful addition. The tutorial was really clear. I even tried a version wrapping the yarn over 2 times instead of 3 at the beginning and got a smaller reinforced hole like the sheepseye without the yarn over. Thanks for posting this!
Awesome, I hope your class goes well! I played around with wraps too and I think you need 3 wraps to stretch over 3 rows, if that makes sense. 2 was too tight for me, but I knit quite tightly in general.
Oo, fantastic! I have bookmarked this and will try it out for certain the next time I do a button hole!
Pingback: Spadea’s Collection of Designer Sewing Tips Vintage | Pages 54 to 77 | Pockets to Collar Magic « Vintage Patterns Dazespast Blog
Love this. Tried a modified version (centered between 2 stitches) on a pillow cover I’ve just finished. Used 2 wraps, & added a lifted increase on the last row to maintain the stitch count. Looks great, even in a super-bulky yarn.
Pingback: Ingenuity | Kniterly
Pingback: Spadea’s Collection of Designer Sewing Tips Vintage | Pages 54 to 77 | Pockets to Collar Magic - Vintage Patterns Dazespast Blog